The Mermaid Mask Walkthrough: All Puzzle Solutions
The Mermaid Mask is a point-and-click adventure game from SFB Games featuring the fan-favorite duo Detective Grimoire and Sally Spears. This locked-room murder mystery has plenty of puzzles and head-scratching moments that will keep you busy for hours.
In this walkthrough, I will focus specifically on the game’s puzzles and explain how to solve each one, including some of the trickier ones. Whether you are stuck on the typewriter puzzle or simply want a little nudge in the right direction with the boat puzzle, I have got you covered! So, without further ado, let’s crack these puzzles and solve the mystery!
Quick Access
Prologue
Mess Hall
Interact with the locked cabinet built into the big metal statue of a serpent to start your first puzzle in the Mess Hall:
Dial Puzzle
Rotate the four dials into the correct arrangement:
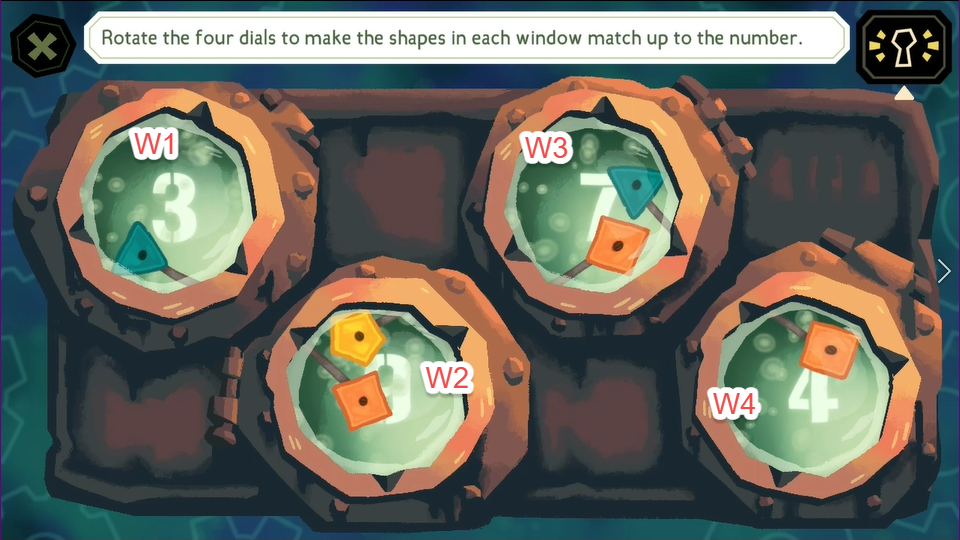
This puzzle features four rotating dials, each with a glass window at its center. Rotating a dial changes the shapes displayed in the surrounding glass windows. Turn the dials to cycle through the available shapes until the correct combination appears.
The shapes consist of triangles, squares, and pentagons with 3, 4, and 5 sides, respectively. Match the total number of sides shown in each glass window to the number displayed on it. For windows with larger numbers, rotate the dials until multiple shapes appear in the window so that the total number of their sides equals the required number.
Here’s the correct solution for the Window (W) puzzle:
- Rotate the dial in W1 until a Square appears in W2
- Rotate the dial in W2 until a Triangle appears in W1 and the Square appears in W3.
- Rotate the dial in W4 until a Triangle appears in W3.
- Rotate the dial in W3 until a Pentagon appears in W2 and a Square appears in W4.
The screenshot below shows the correct arrangement of the shapes in each window:
Chapter 1: The Curse in the Cauldron
Bunk Room
Interact with the cellphone in the Tuxedo’s pocket. To unlock the cellphone, solve the puzzle:
Crossword Puzzle
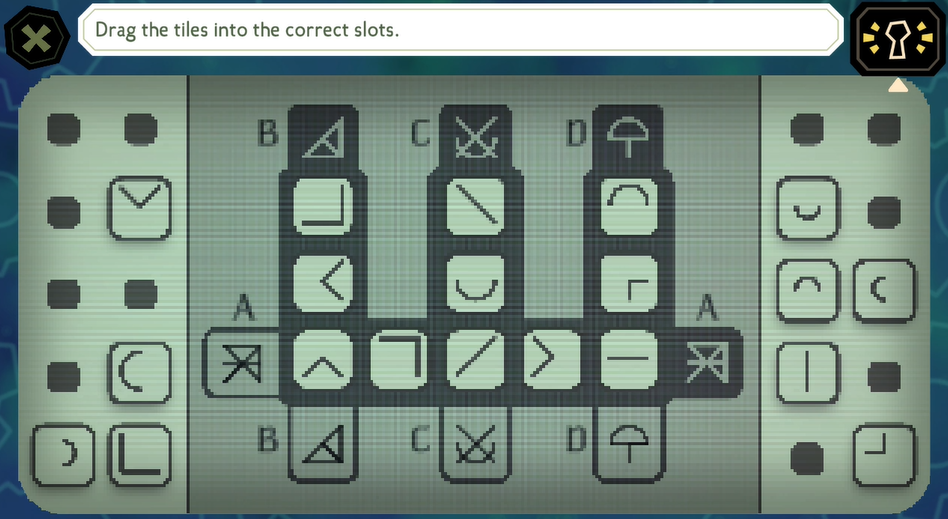
This is a crossword-like puzzle game, but instead of words, you will drag shapes into the correct slots. There are four dark tiles labeled B, C, D, and A. Drag and drop the shape tiles into the empty slots so that their combined shapes on the light tiles match the shapes of the dark tiles. Since A overlaps with B, C, and D, the shared tiles must also match the shape combinations required by A. There are a couple of different ways to make the shapes for each tile, so feel free to experiment until you find a valid combination.
Here’s the solution to the puzzle:
Typewriter Puzzle
Click on Wirman’s typewriter to solve the next puzzle.
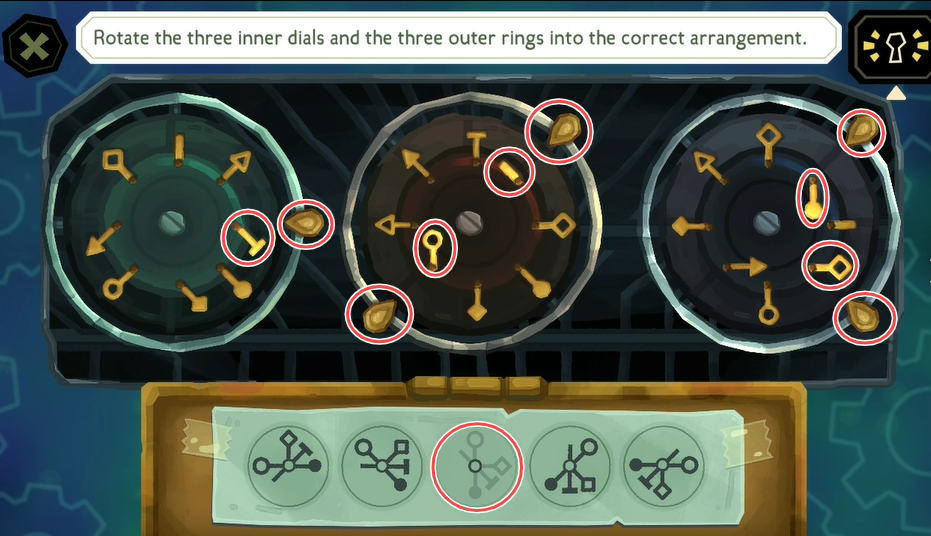
There’s a strange mechanism on the back of the typewriter. You will have to rotate the three inner dials and the three outer rings to get the correct dial arrangement on the middle circle at the bottom of the screen. The outer rings have small arrows pointing to specific shapes on the inner dials. When the arrow on the outer ring points to a shape on the inner dial, that shape glows.
Rotate the inner dials to position the shapes at specific angles, then rotate the outer rings to align their arrows with the shapes to get the correct arrangement on the middle circle at the bottom of the screen.
In the diagram, from left to right, the dials on the circles at the bottom of the screen are in a sequence, and your goal is to rotate the inner dials and the outer rings to show the missing sequence in the middle circle.
Here’s the correct solution to the puzzle:
The typewriter puzzle is easily one of the hardest puzzles in The Mermaid Mask. It took me several attempts before I finally figured it out.
Child’s Room
Interact with the wooden chest near the wardrobe to solve the next puzzle.
Lens and Card (Doll) Puzzle
Arrange the six cards and four glass lenses to complete the puzzle. Before solving, move all the lenses and cards aside to read the clue in the background:
Jennifer and Margaret gaze jealously at Patricia, whose doll is neither too large nor too small.
Put the six cards in pairs to make three images of the same girl. Next, put the glass lenses over their faces and the dolls to warp them.
Two of the lenses use magnification to make objects smaller or larger. The other two use the fish-eye effect, which bends the images in different directions.
- Arrange the cards to make three images of the same girl:
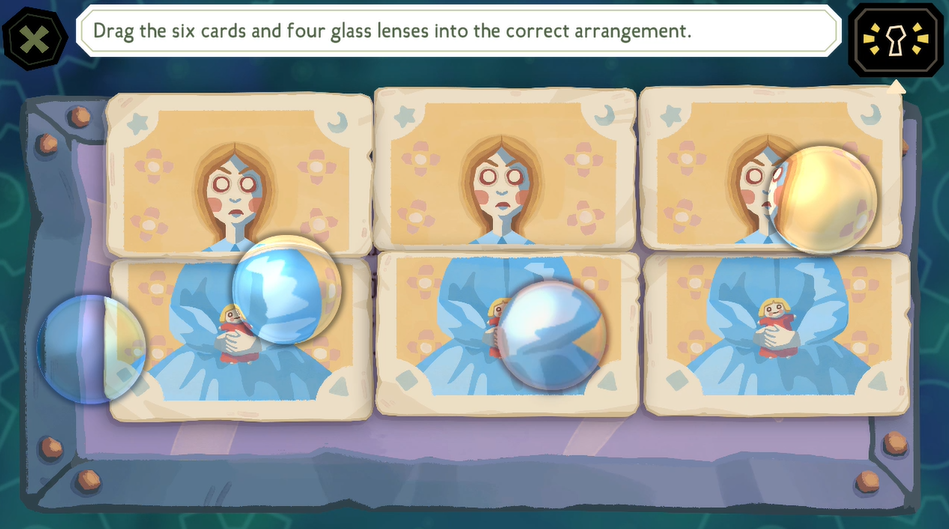
2. Next, place the magnification lenses over the dolls on the left and right images to make them smaller and larger.
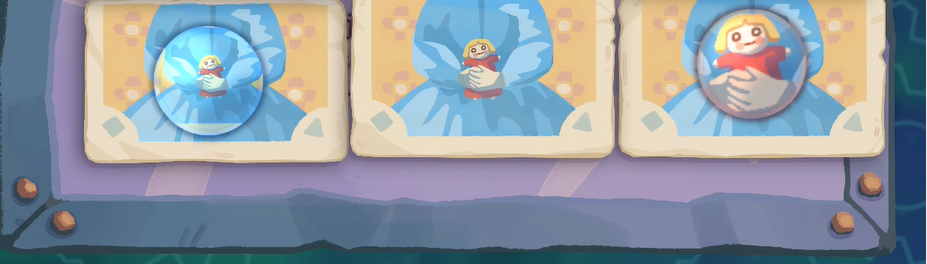
3. Now place the fisheye effect lenses over the faces of the two girls on the left and right. Place them in such a way that it makes them look at the doll in the middle image:
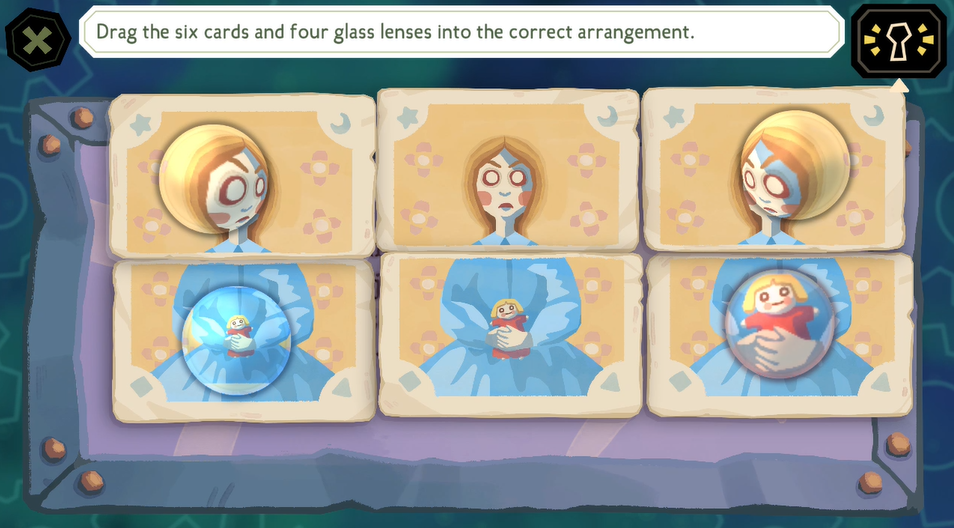
The positions of the lenses over the faces of the two girls should match the screenshot above, and only then will you be able to complete the puzzle.
Control Room
Interact with the control panel. Click on the electrical switchboard to begin the next puzzle.
Switchboard Puzzle
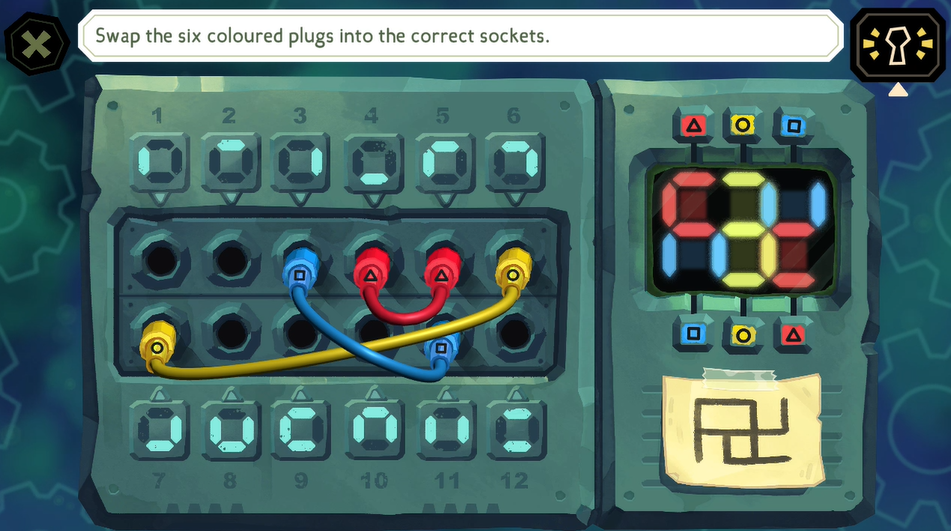
Swap the six colored plugs into the correct sockets. The plugs are colored red, yellow, and blue.
Noticed the digital display on the right? It changes depending on which plugs are in which sockets. The display changes based on the various inputs from the colored plugs. For example: The top-left part of the display lights up by the red triangle plug set, and the bottom left lights up by the blue square plug set.
Put the colored plugs into the right sockets so that the digital display matches the drawing on the piece of paper in the lower-right corner of the screen. Try swapping the plugs between different sockets until the display starts to match the drawing. Note that the plugs are in sets of two, so the output on the display is the combination of a set of plugs plugged into two sockets.
The screenshot below shows the correct plug positions. The digital display matches the diagram at the bottom:
Bunk Room
Click on the piggy safe in the lower-right corner of the room to start the next puzzle:
Pig Safe Puzzle
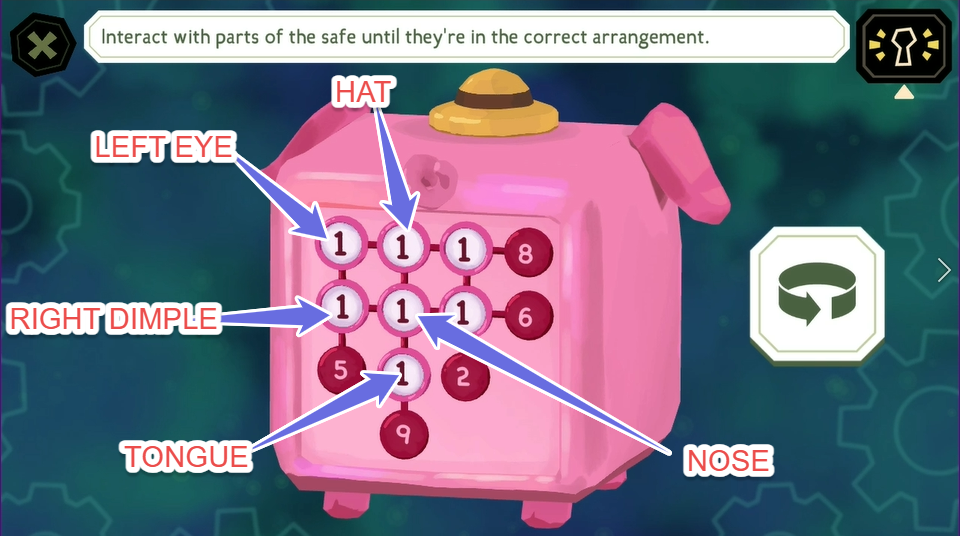
You can interact with the parts of the pig-shaped safe: Eyes, Nose, Dimples, Hat, and Tongue.
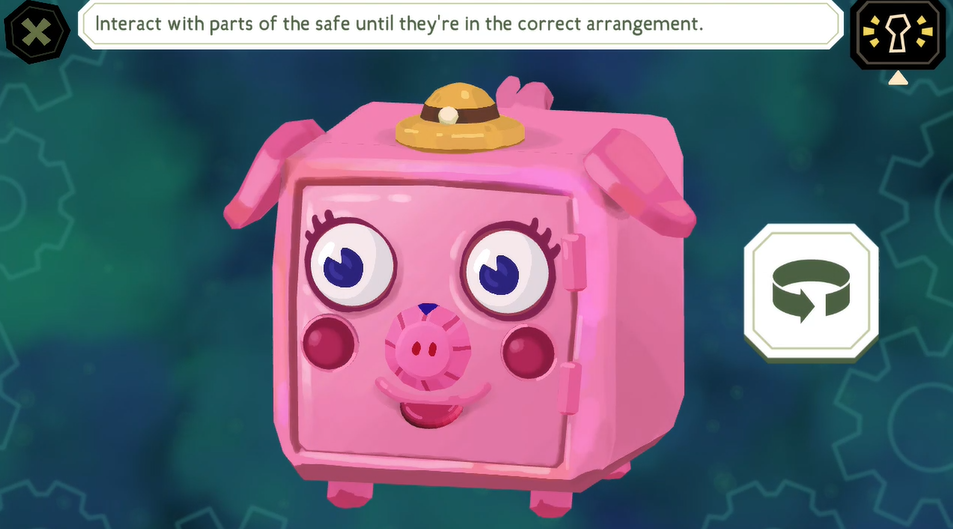
Press the Rotate button to view the back of the safe. There’s some kind of display with numbers at the back.
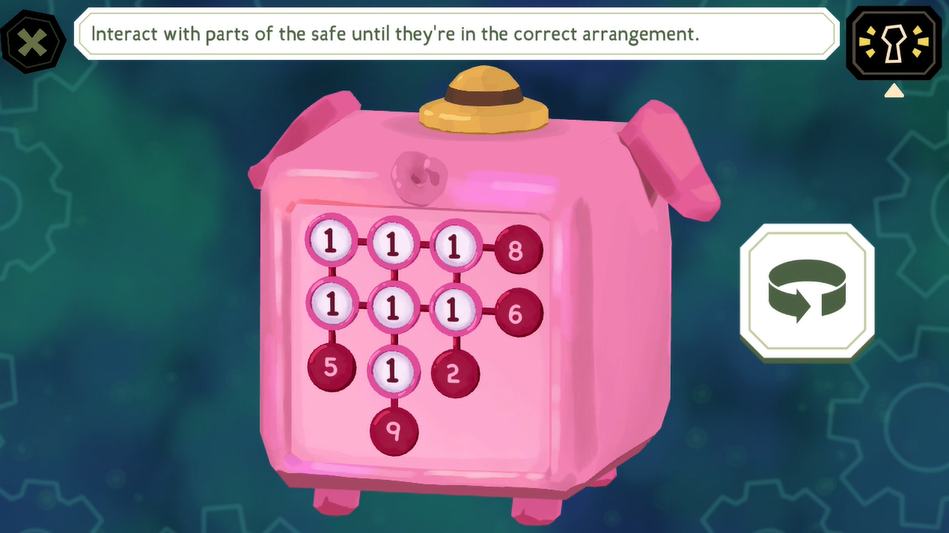
Now turn the hat around while looking at the display. You will see the number in the first row, middle column change. Similarly, if you interact with the other parts, it will change the numbers in the other rows/columns.
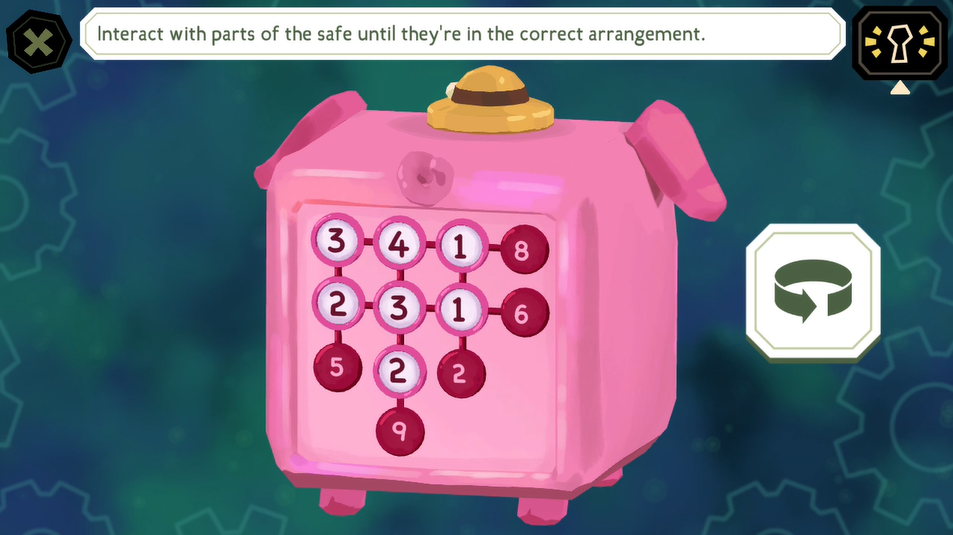
The numbers inside the red circles are the target totals. Your objective is to interact with each part of the safe to bring the correct numbers on the white circles so that their sum matches the target totals of the red circles. You have to get the numbers in each row and column on the display to add up to those totals.
Here’s a guide to know which part changes the numbers on the white circles:
Here’s the solution to the pig safe puzzle:
Dream Chamber
Interact with a set of perfume bottles kept on the shelf on the right side of the room to start the next puzzle.
Perfume Bottle Puzzle
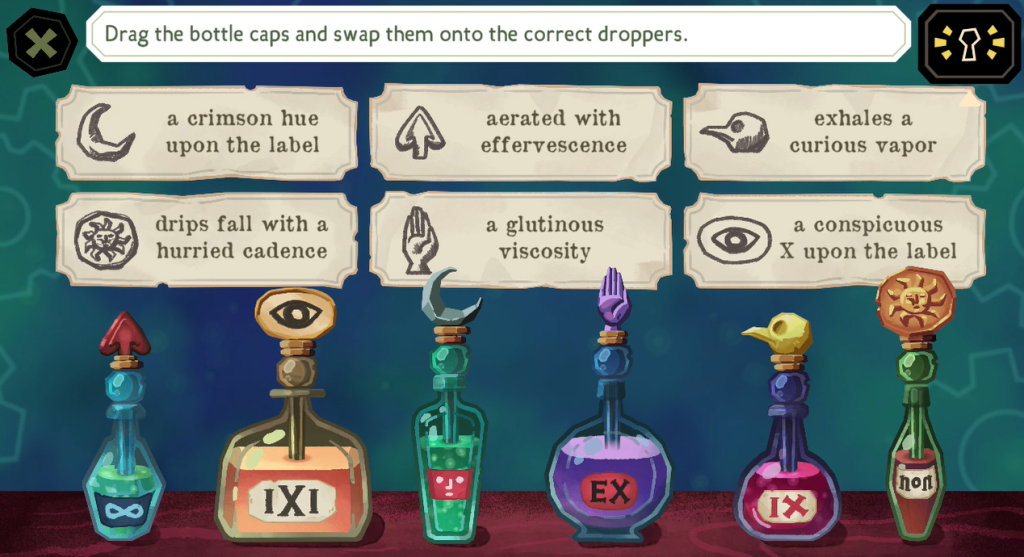
There are six perfume bottles, each with a dropper and a cap. Each bottle has a specific cap that matches it. Start by examining the bottles and lifting their droppers. This allows you to inspect the drips and vapors and even check the viscosity of each liquid.
Your objective is to swap the caps until each one is placed on the correct bottle. Use the hints showing the cap symbols to determine where each cap belongs. Drag and drop the caps on the right bottles to complete the puzzle.
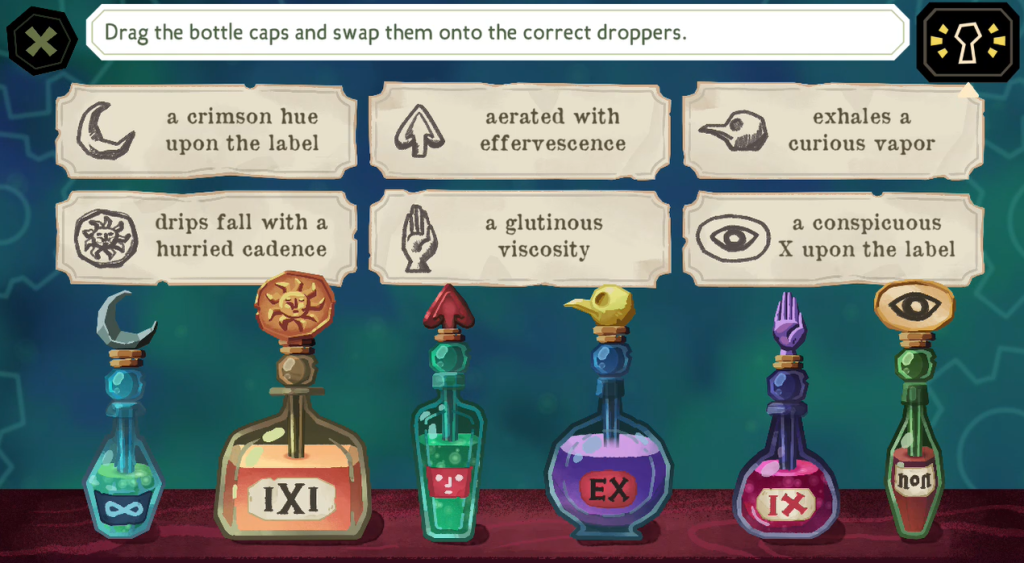
Correct cap arrangement based on the hints at the top of the screen:
Airlock Grotto
Interact with the heavy old diving helmet to start a new puzzle in this room.
Diving Helmet Dial Puzzle
You can drag the diving helmet to rotate it. There are nine dials placed around the diving helmet. They are connected by little pipes along the surface of the helmet.
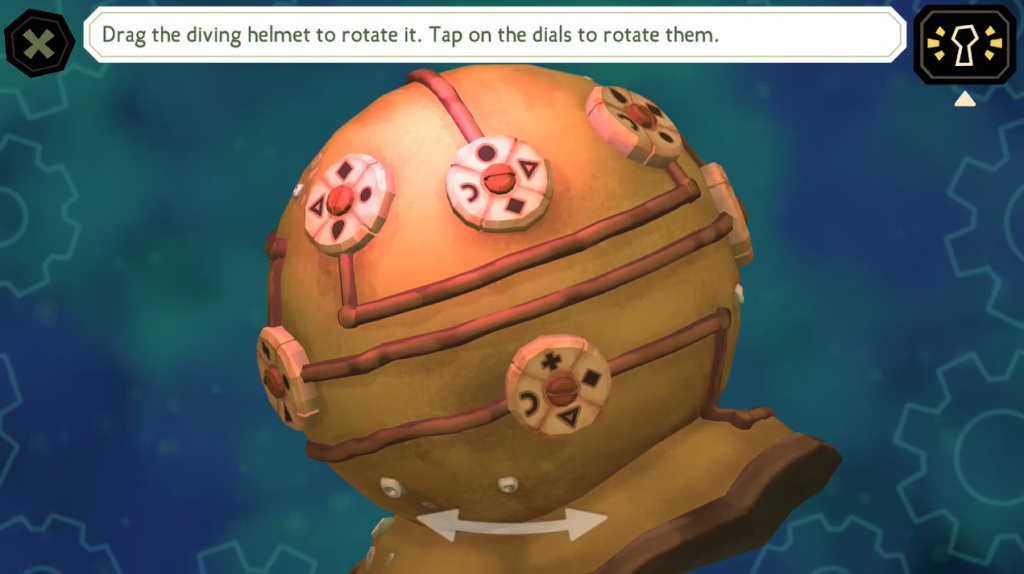
The pipes attach to one of the four quadrants of each dial. Each quadrant bears a symbol. Tapping the helmet’s dials also rotates them. Each dial can be set to one of four different angles.
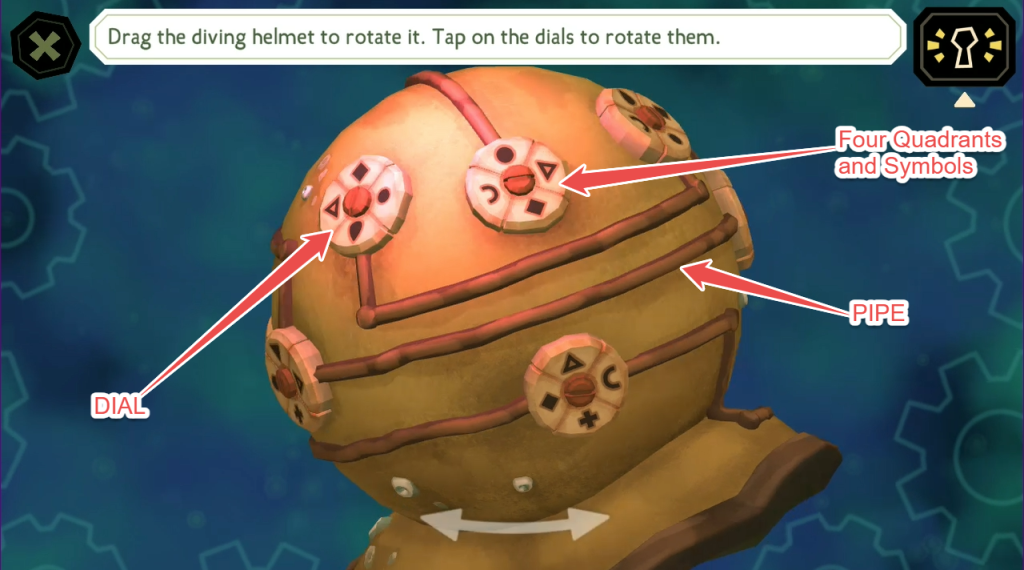
The pipes connect symbols on different dials. Rotate the dials until all the symbols connected by the pipes match.
Here’s the correct solution to the puzzle. Since I have to rotate the helmet to show the connected symbols on each dial, I will need to use multiple screenshots to show the complete solution. I have marked the matching symbols on the dials with green circles:
A. Dial 1 > Dial 2
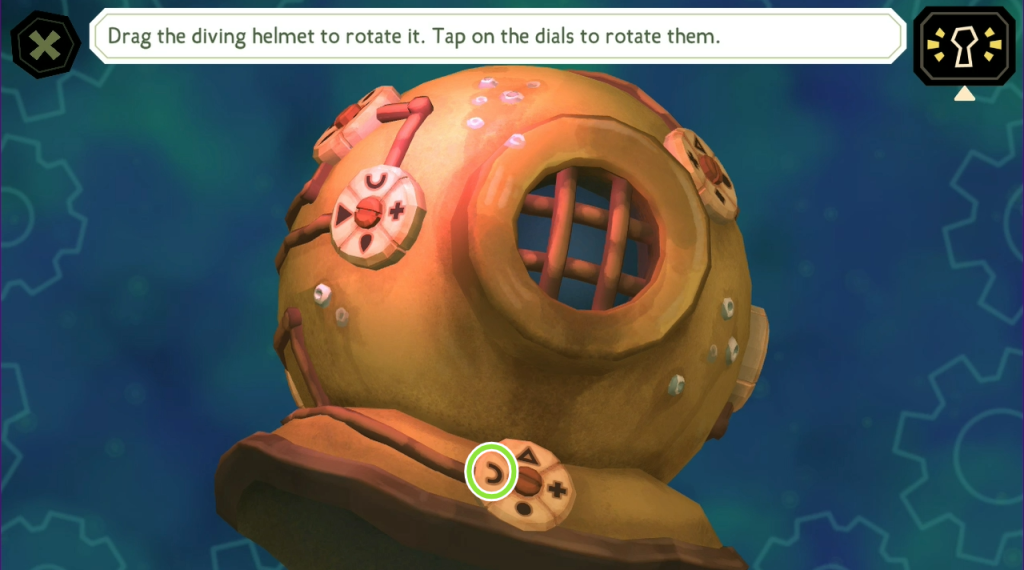
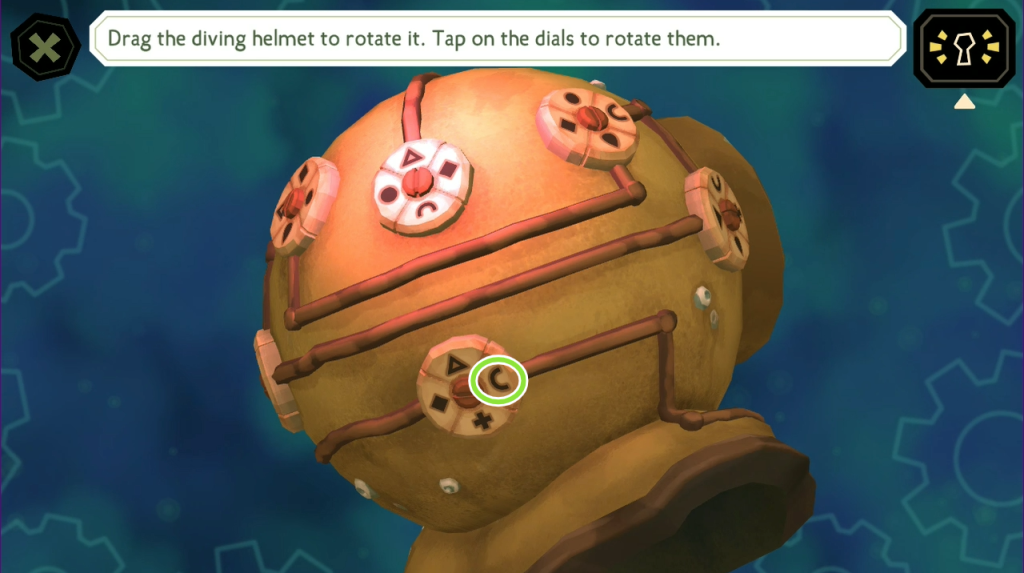
B. 2 > 3
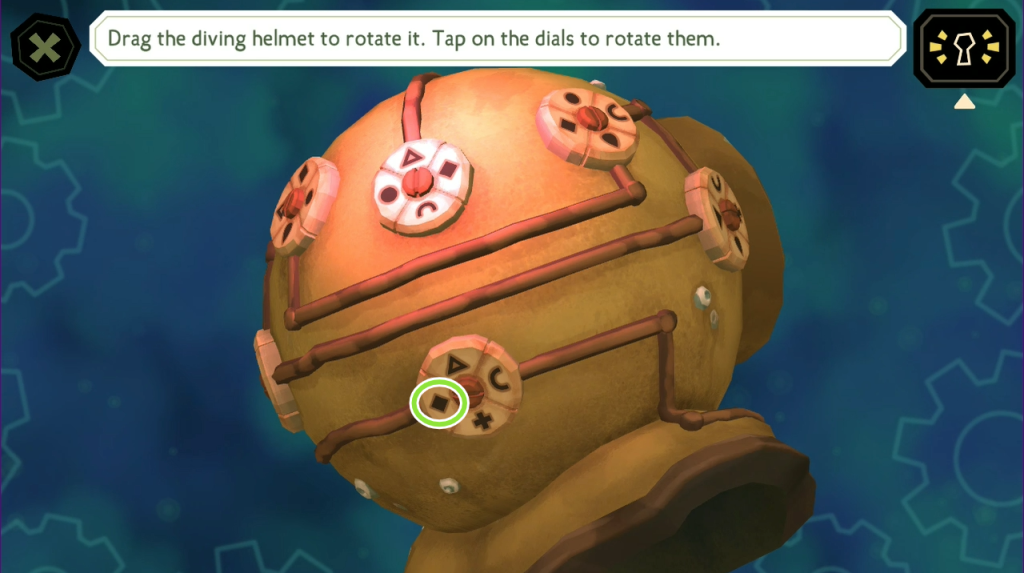
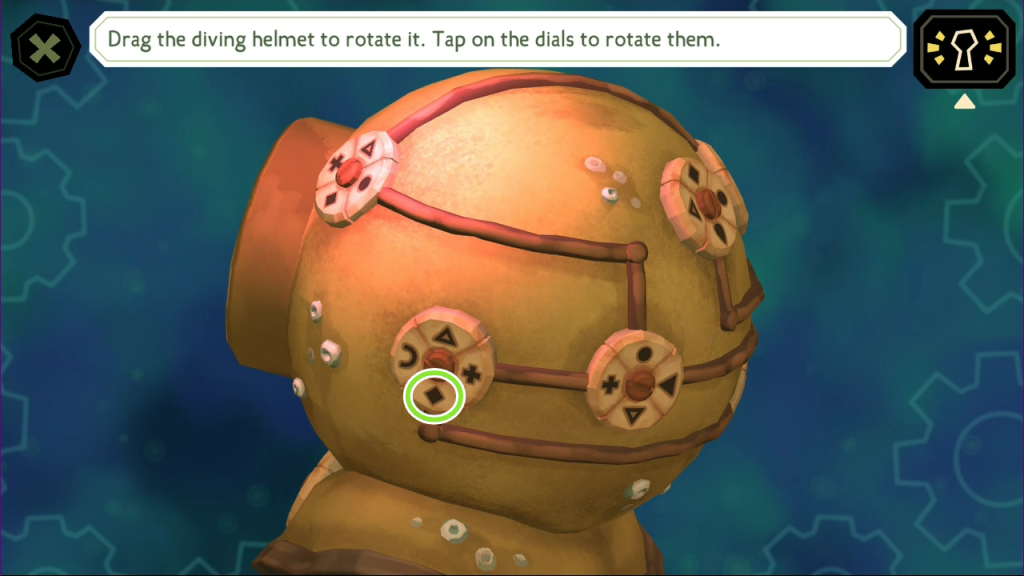
C. 3 > 4
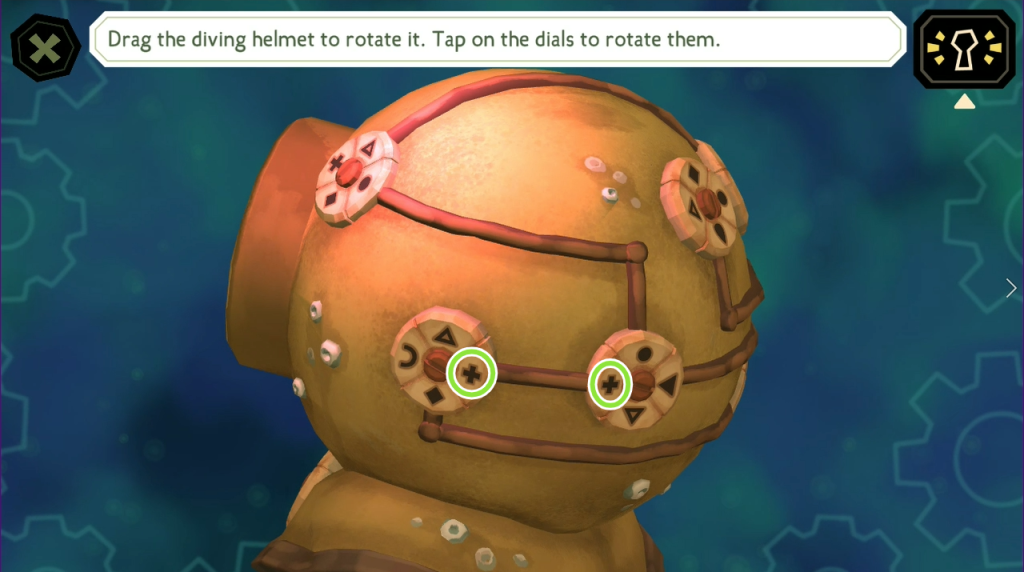
D. 4 > 5
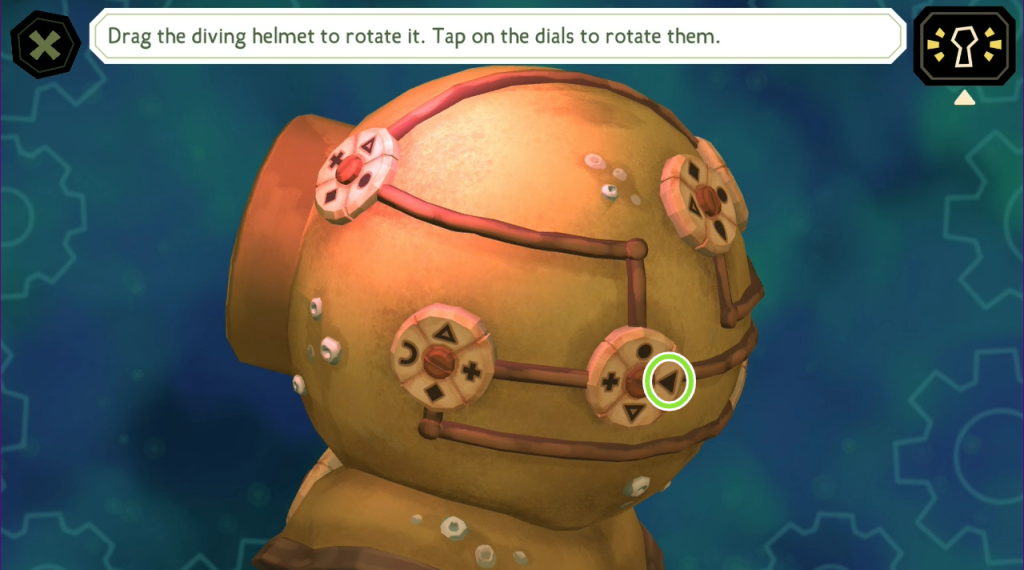
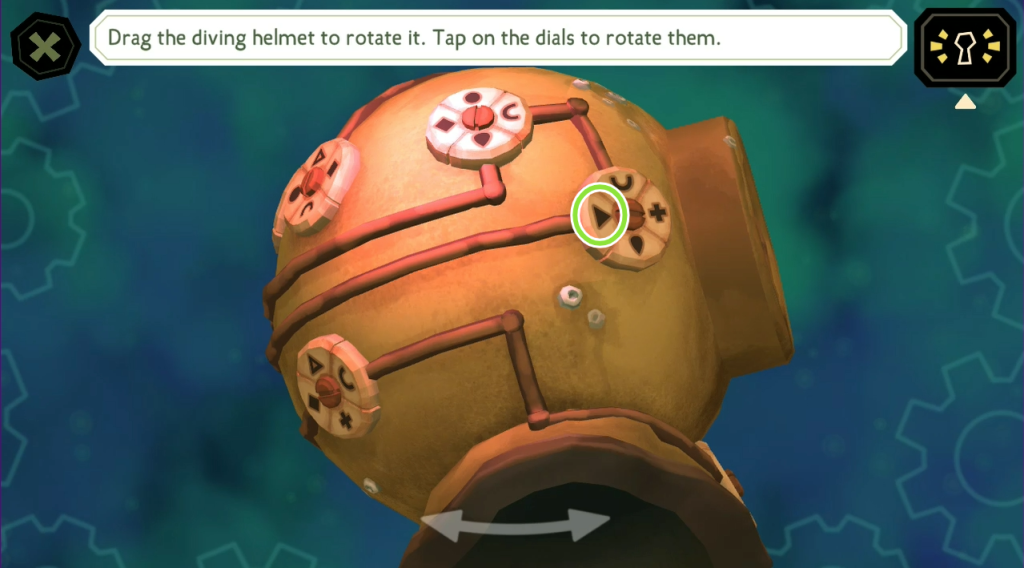
E. 5 > 6
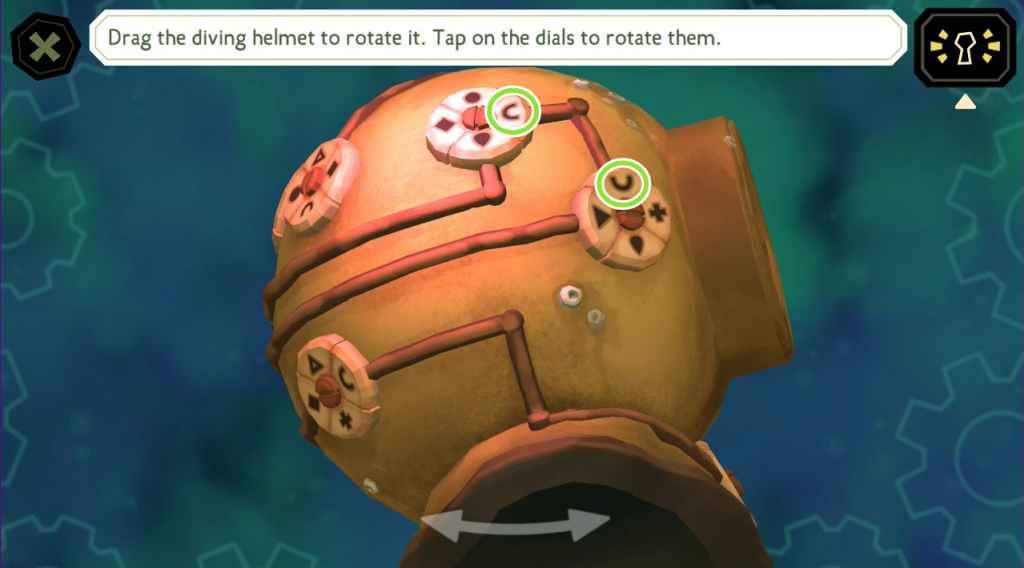
F. 6 > 7 [Dial 7 Doesn’t Connect with Dial 8. Dial 4 Connects with 8]
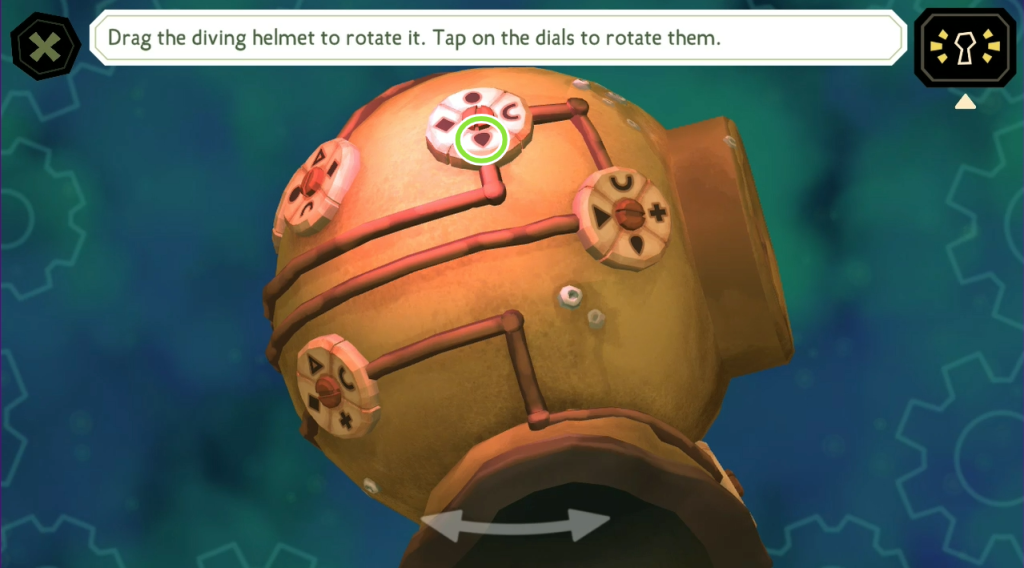
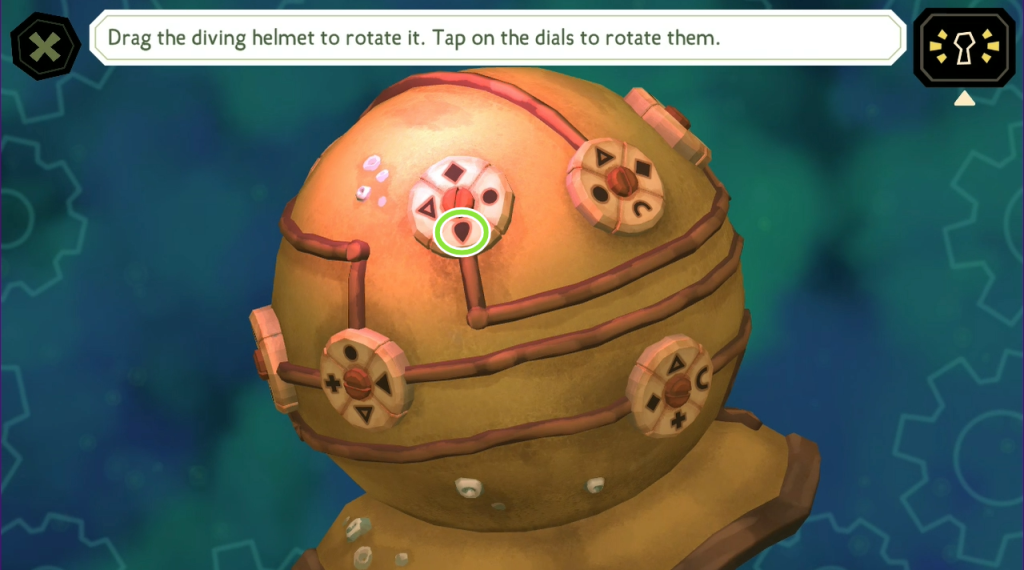
G. 4 > 8 [Dial 4 Connects with both Dial 5 and Dial 8]
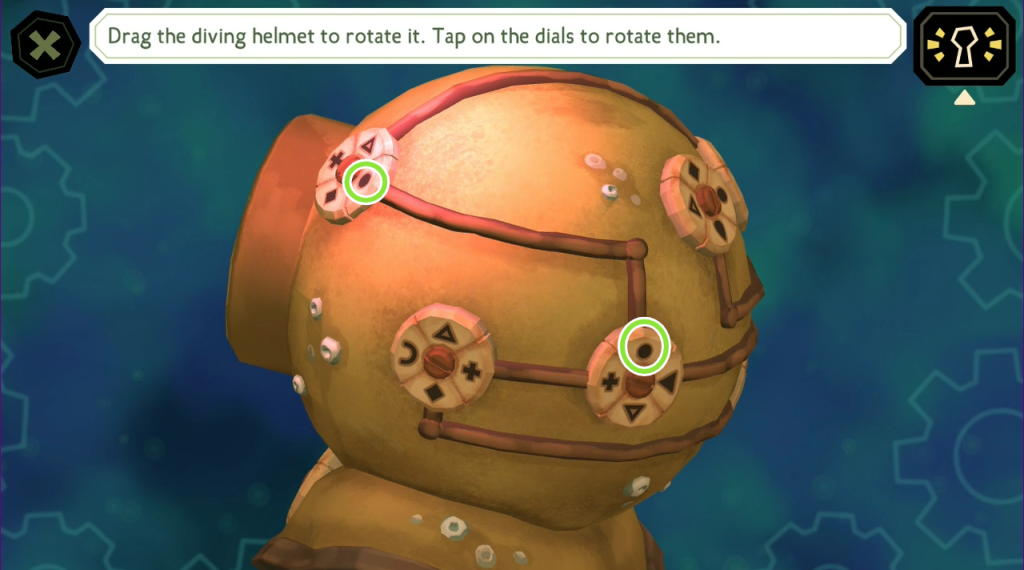
H. 8 > 9
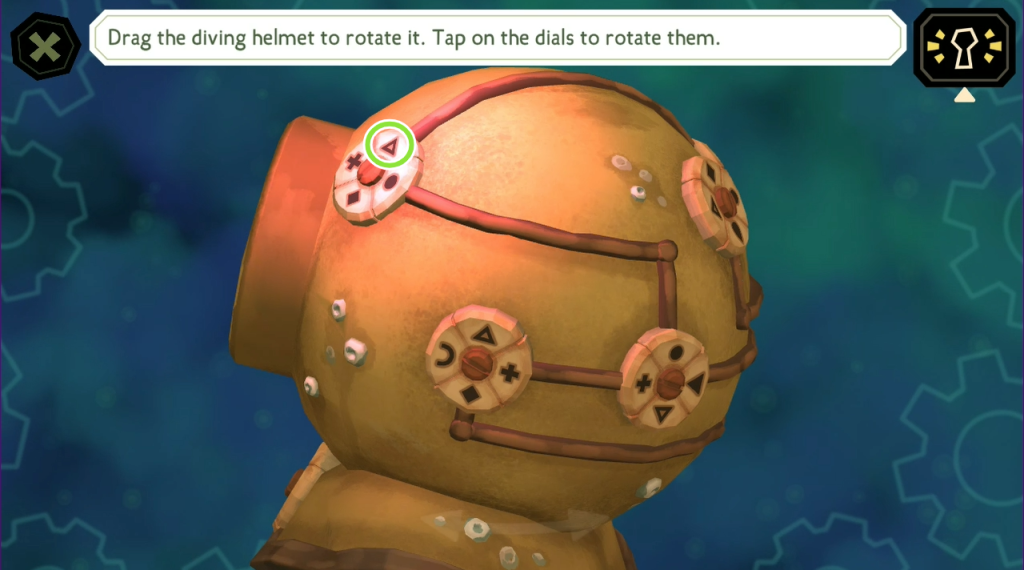
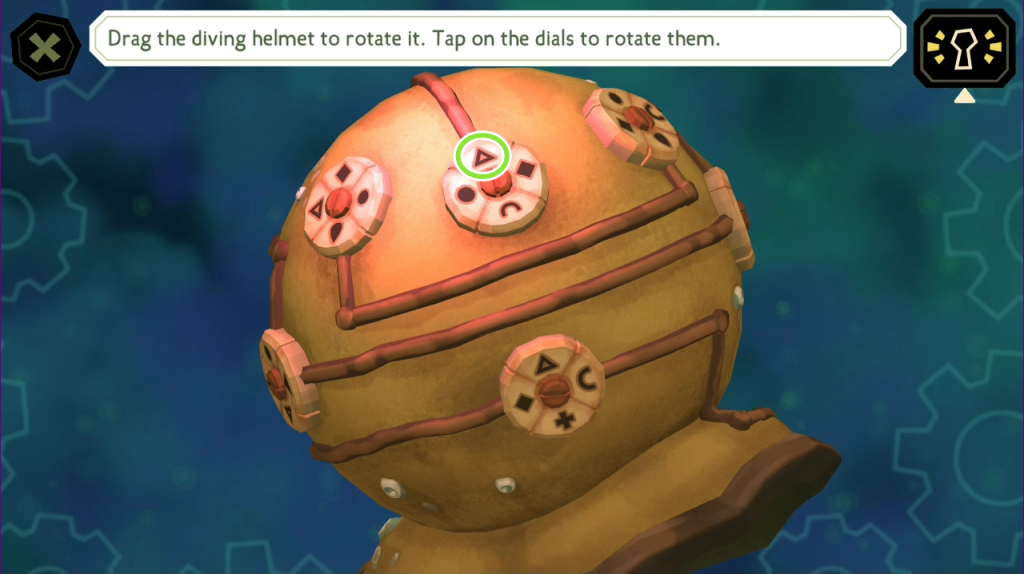
Engine Room
Interact with the selection of compasses near the cutout to begin the next puzzle.
Compass Puzzle
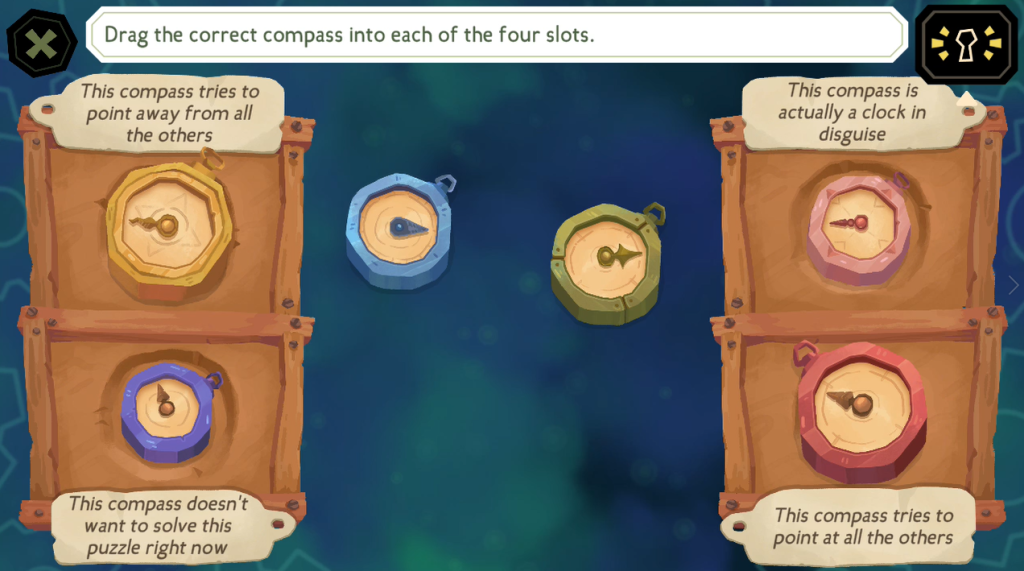
The compass puzzle is one of the most interesting puzzles in The Mermaid Mask. There are four slots, and each one describes a specific compass. Place the correct one according to its description. Before solving the puzzle, test each color-coded compass by moving it around to see how it works, and keep an eye on the needles while moving them around. It’s all about how the needles behave depending on the position of the compasses. Hint: One of them is actually a clock!
Solution:
1. Yellow: Its needle always points away from the others when you move it around them.
2. Purple: Its needle stays still when you move it around.
3. Pink: It’s a clock. Pay attention to its needle. It keeps ticking away. Tick-tick-tick!
4. Red: Move it around, and its needle always points at all the compasses.
Cargo Hold
The Pinboard Puzzle
When interrogated about the Mortuga Submarine, Mariana Moon said that she had recorded her experience touring the submarine in her diary.

Click the Diary icon to view her account of the events in a storybook format. She describes visiting different rooms in the submarine and seeing its residents going about their activities.
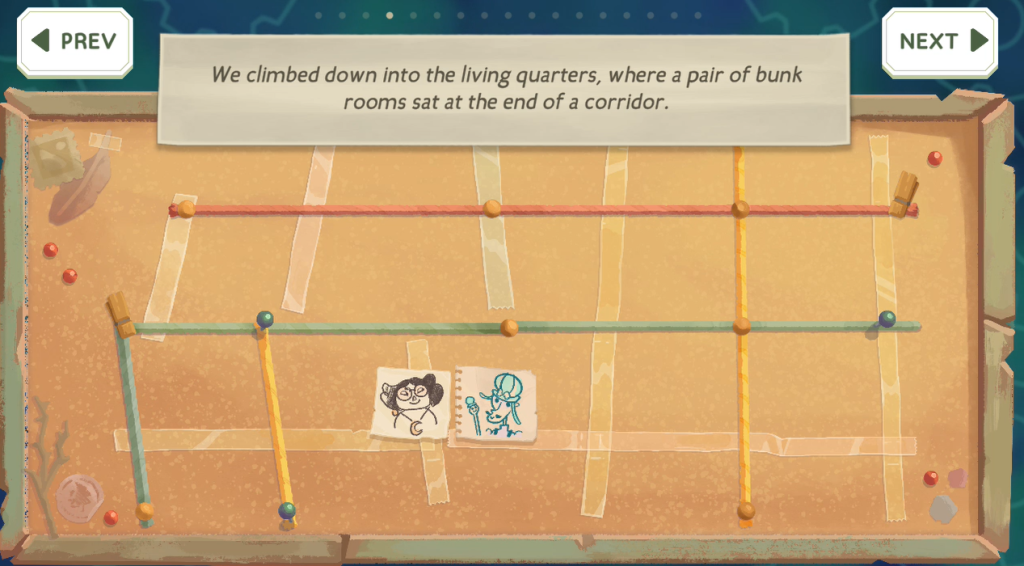
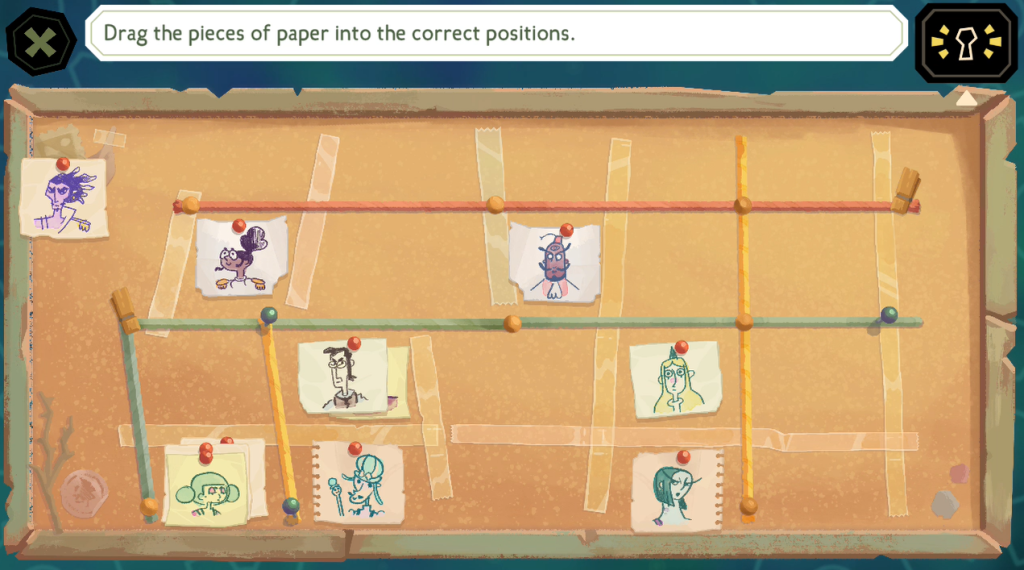
You may have to read her diary again to solve the pinboard puzzle. Interact with the pinboard kept on top of the barrel to solve it.
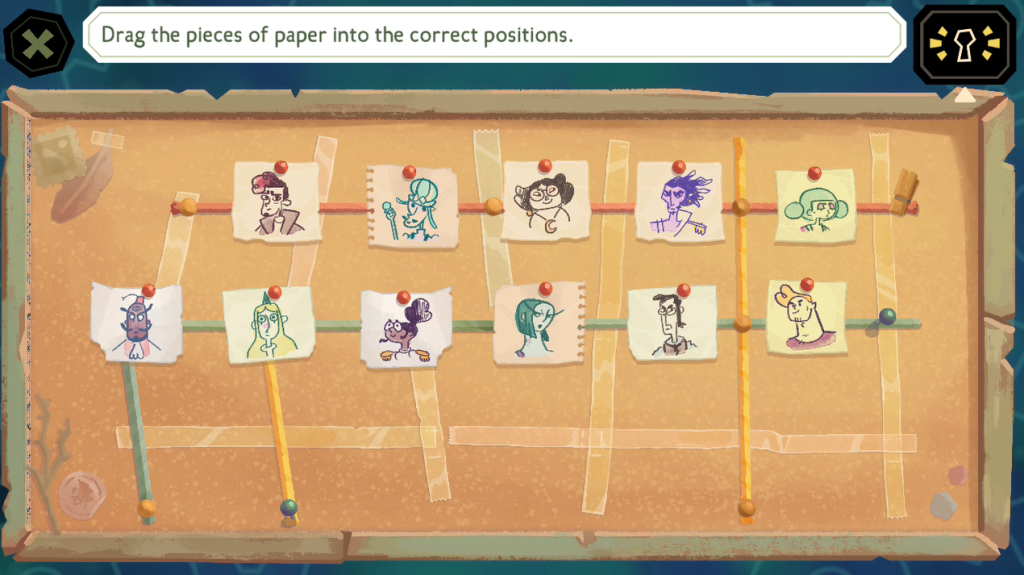
On the pinboard, you will see drawings of all the suspects, along with the victim, Mortuga, and detectives Grimoire and Sally Spears. Drag the pieces of paper to the right segments on the board. The diagram looks familiar – the segments on the board resemble the rooms on the submarine.
To solve this memory puzzle, revisit the diary to determine where each room is located on the pinboard based on Mariana’s descriptions. You will also need to consult the Submarine map to find out who currently lives in each room. Talk to Mariana again to view her diary. Since Mortuga is no more, he should not be in any segment on the pinboard.
You can refer to the screenshot below to know who currently resides in each room:
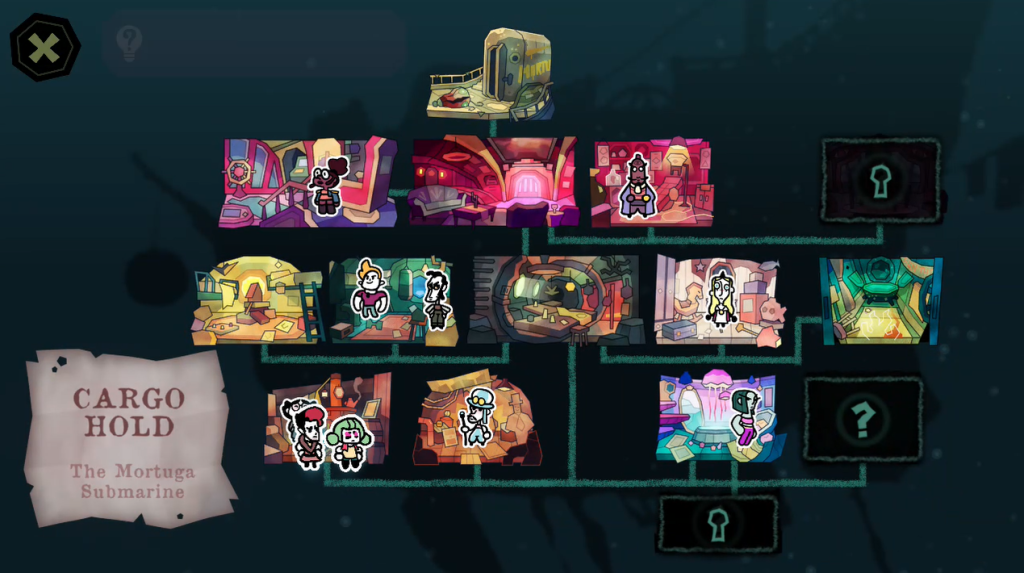
Note that the position of the segments on the pinboard and Mariana’s diary may differ slightly from the actual rooms on the Submarine map.
Solution:
Detective Grimoire, Sally, and Mariana cards should be placed inside the lower-left corner segment. Wirman and Dirk Dansom cards should be on the segment above Godrik Gripps ‘ segment. The rest of the suspects are shown in the screenshot below:
Bilge
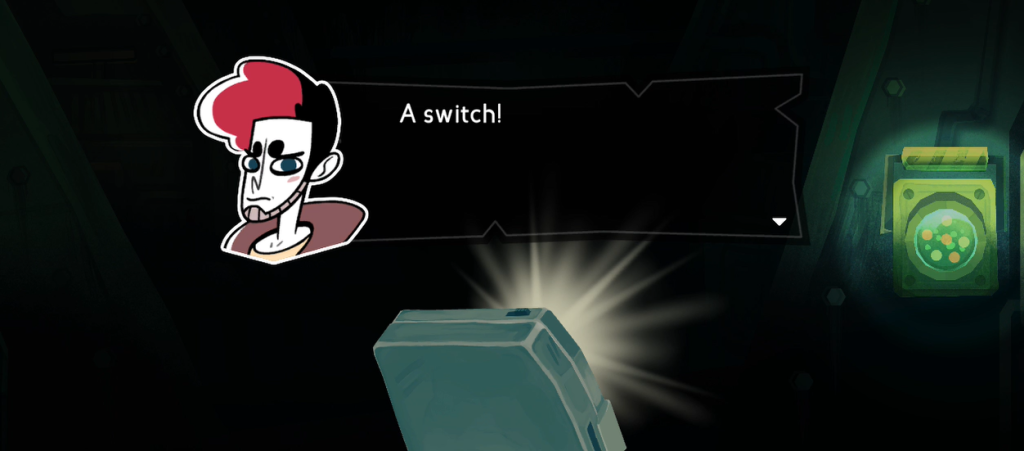
Using the torch on Dirk Dansom’s cell phone, inspect the Bilge for any clues. Interact with a strange-looking switch on the right side of the room to solve a new puzzle.
The Glass Orb Puzzle
There are two dials. Each dial consists of an outer metal dial and an inner glass orb. You can rotate the glass orbs. You can turn the outer dials, which can also rotate the glass orbs, but in a different way.
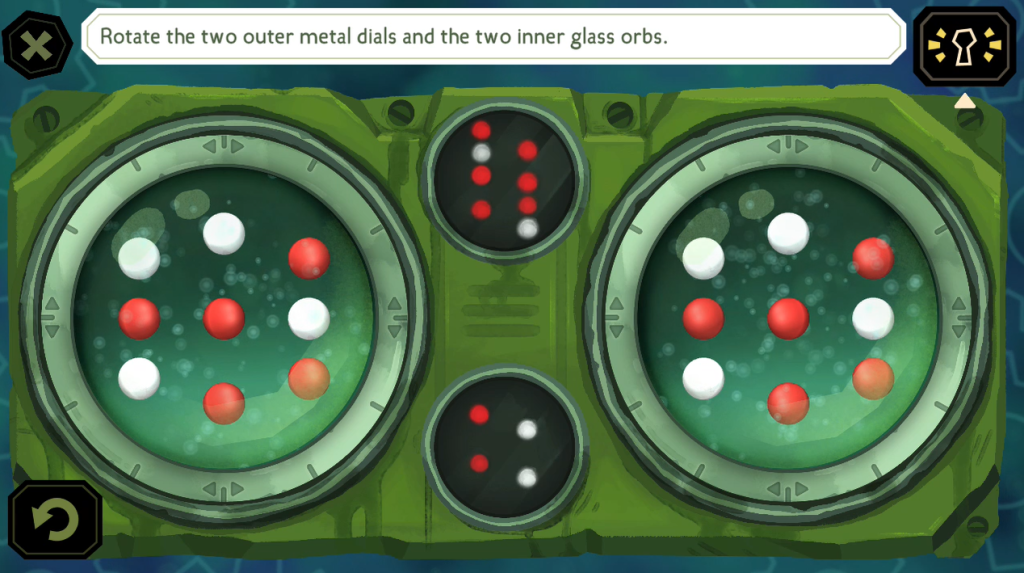
In the middle are two small screens displaying red and white lights. Turn the dials and rotate the orbs correctly to recreate the same patterns on the screens. Either orb can be used to produce either of the two solutions.
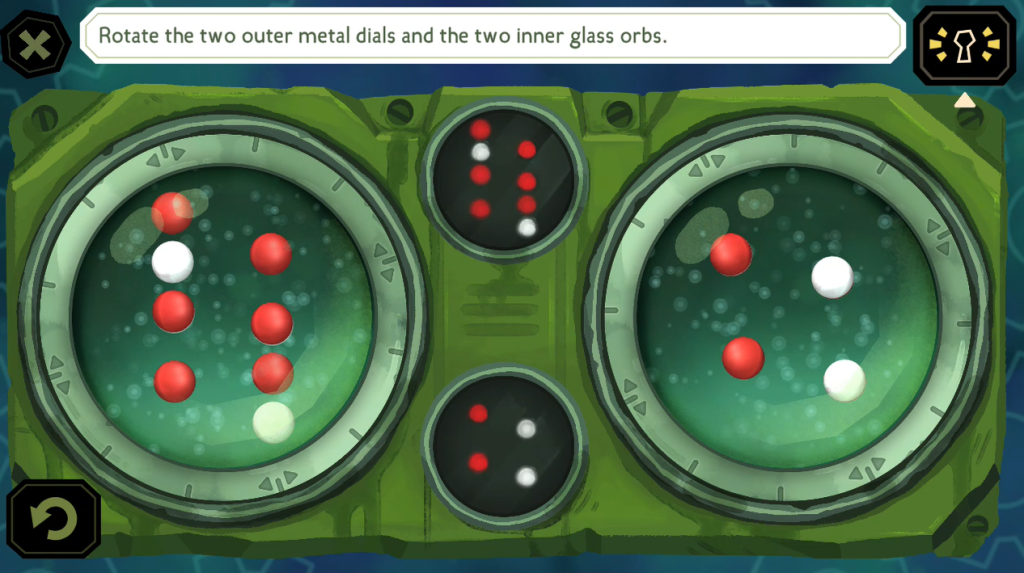
Simply put, rotate the glass orbs and turn the outer dials so the red and white balls inside the orbs match the red and white patterns on the two small screens. You will have to rotate in such a way that certain balls in the orbs are hidden behind other ones, and only then will you be able to replicate the pattern.
This puzzle can only be solved through trial and error, so you will need to be patient and take your time while rotating the orbs and turning the outer dials to replicate the patterns.
Solution:
Captain’s Cabin
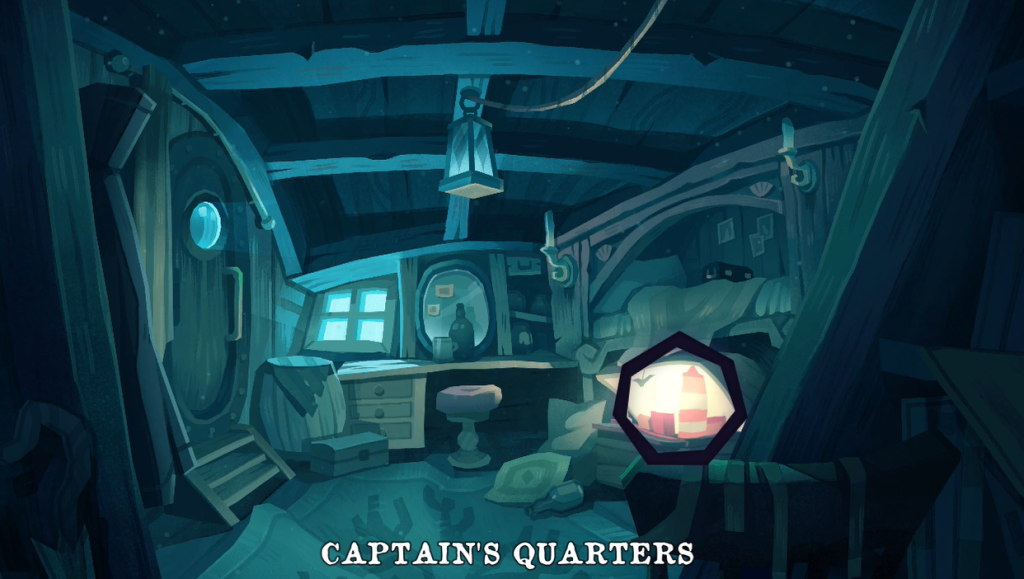
Open the locked Captain’s Cabin with the eyeball key and examine the painting. After examining the painting, ask the suspects about the painting until Detective Grimoire tells Sally to return to the Captain’s Cabin and have another look at it.
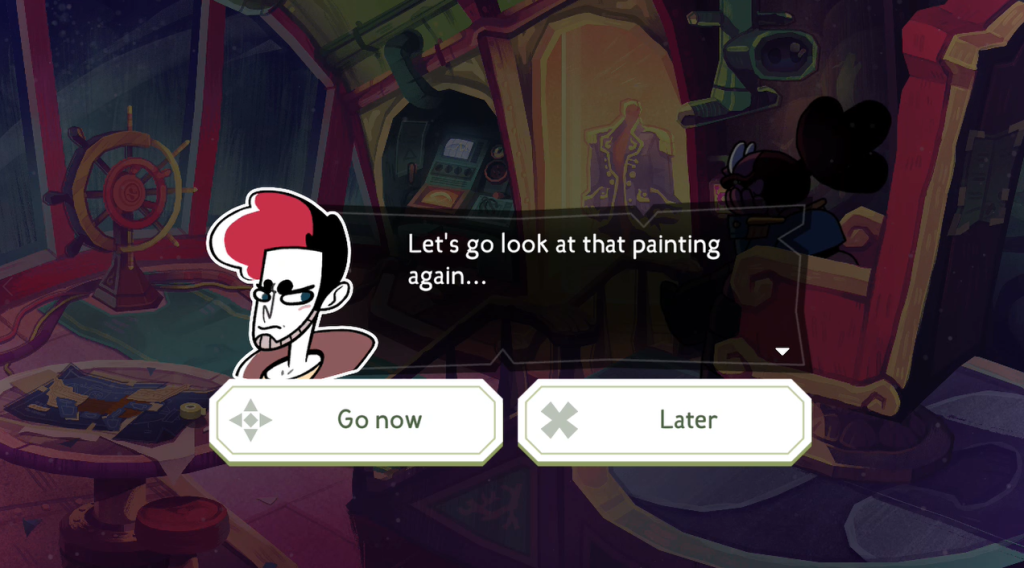
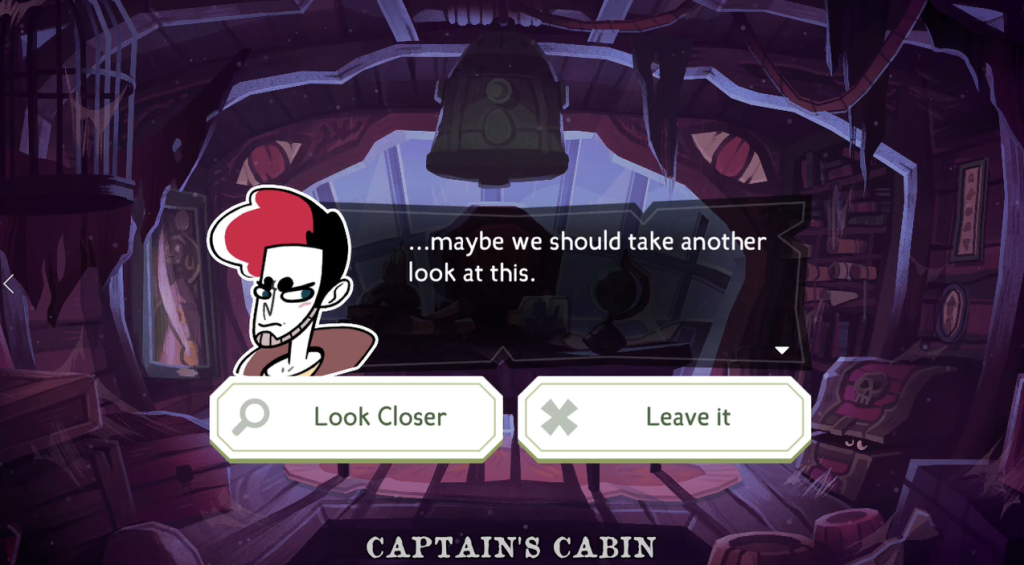
Return to the Captain’s Cabin and inspect the painting once again. Click on “Look Closer”.
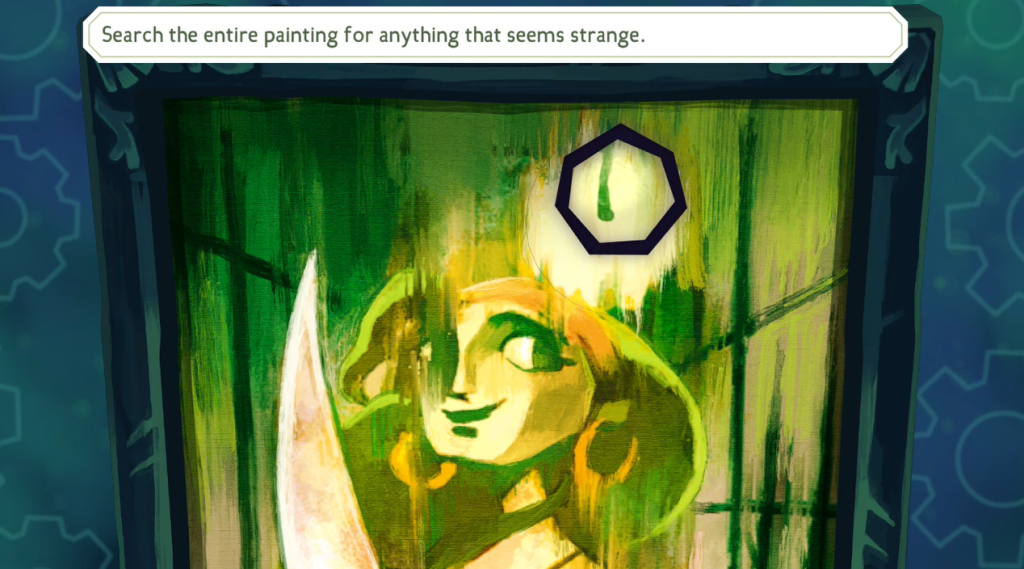
Search the entire painting for anything that seems strange. Scroll up and click inside the Sun (Circle) behind the damsel. Click on “Rotate it” to turn the Sun.
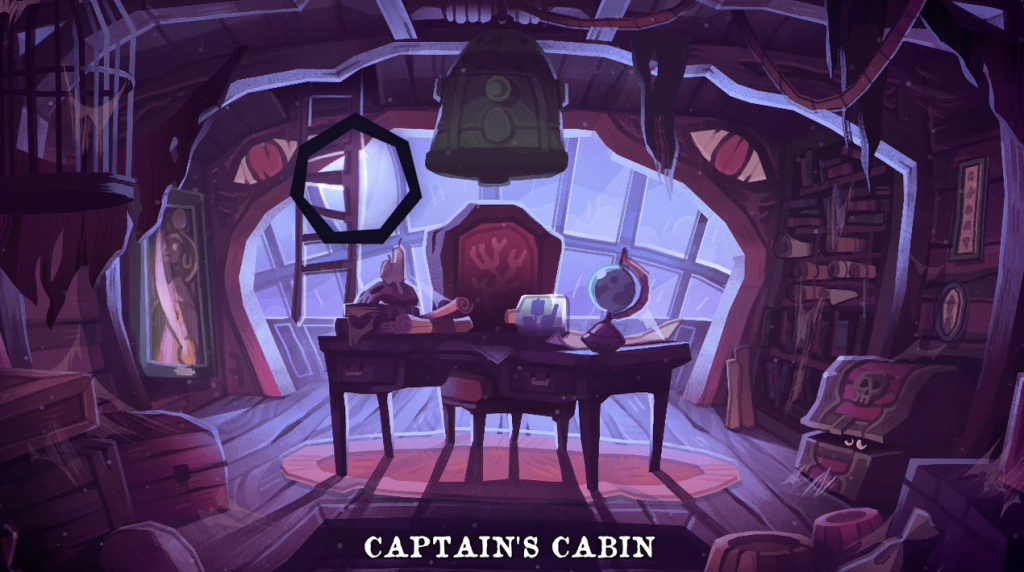
When you turn the upside-down Sun back into its correct position, a ladder emerges from the ceiling. Click on the ladder to climb up to the Captain’s Quarters.
Click on the Model Town in the Captain’s Quarters to begin the next puzzle.
Boat Puzzle
Nine boats are placed on a rectangular chessboard. You can only drag to swap the sails between the nine boats and tap on the boats to rotate them, making them face different directions on the grid. While rotating, pay attention to the direction they face – they can only point in straight lines or diagonals.
The numbers on the sails represent the movements on the grid. So if a boat has “II” on its sail, it means it will move only two squares in straight lines or diagonals.
Boats can’t be moved, and this puzzle shows a sequence, kind of like a journey of a boat from start to finish. The start point is the arrow tile on the left side, and the end is the red X:
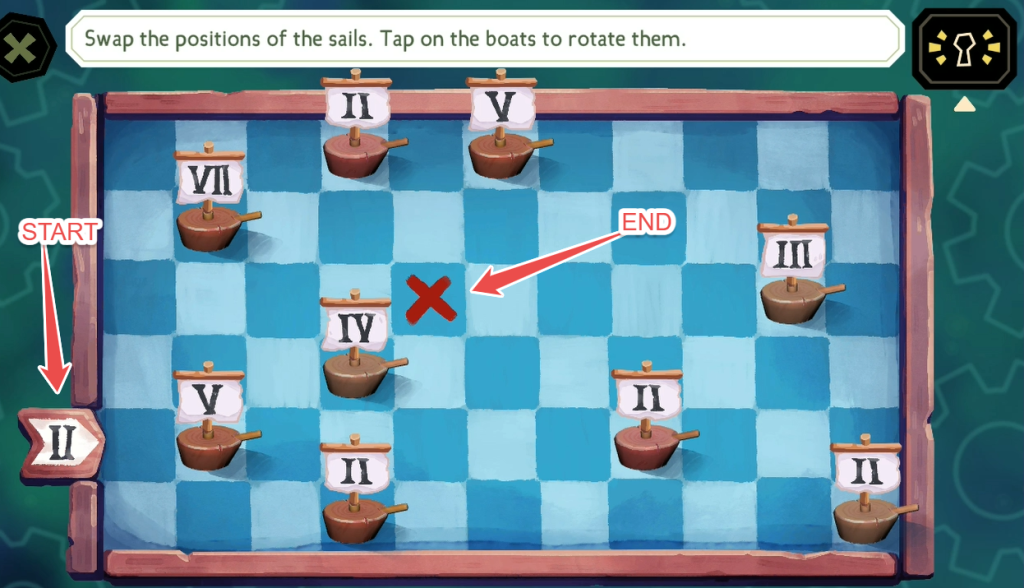
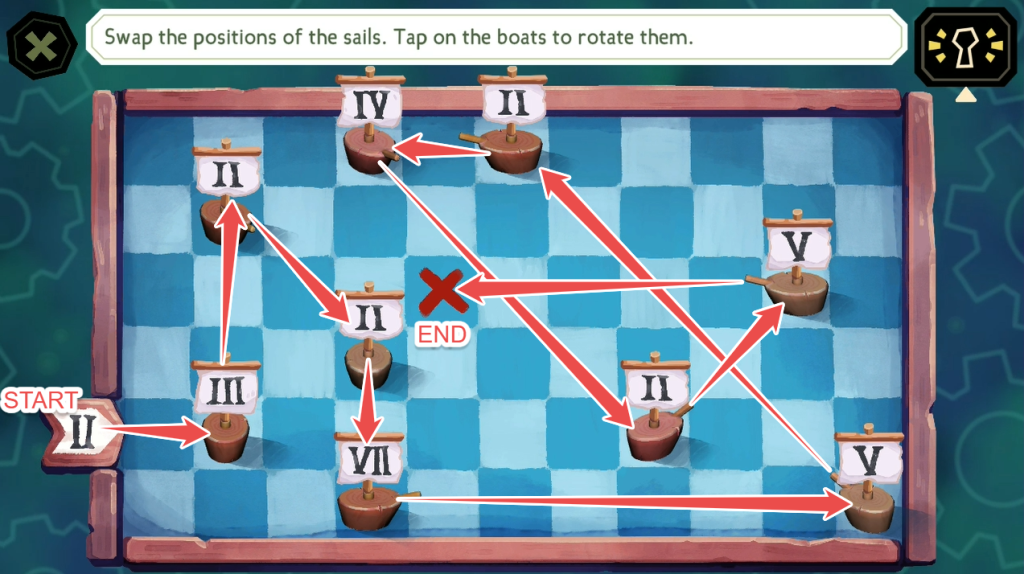
Your objective is to plot a journey from boat to boat, going from the start point to the end point. To make this possible, you will have to swap the sails and also change the direction of certain boats so that each boat moves the correct number of squares in the right direction, creating an unbroken path from the start point (arrow tile) to the red X.
Solution:
*This puzzle solutions/walkthrough is being updated continuously as I progress through the game. If you have any tips, drop a comment. I would be happy to add them to it!